
Overview
An inventory application needs relational storage without exposing its database to the internet. Build Amazon RDS for PostgreSQL, then query three sample products from EC2.
RDS manages database hosting, maintenance mechanisms, and backups. You control access, schema, credentials, and configuration. This exercise uses one database instance without automatic failover.
Architecture
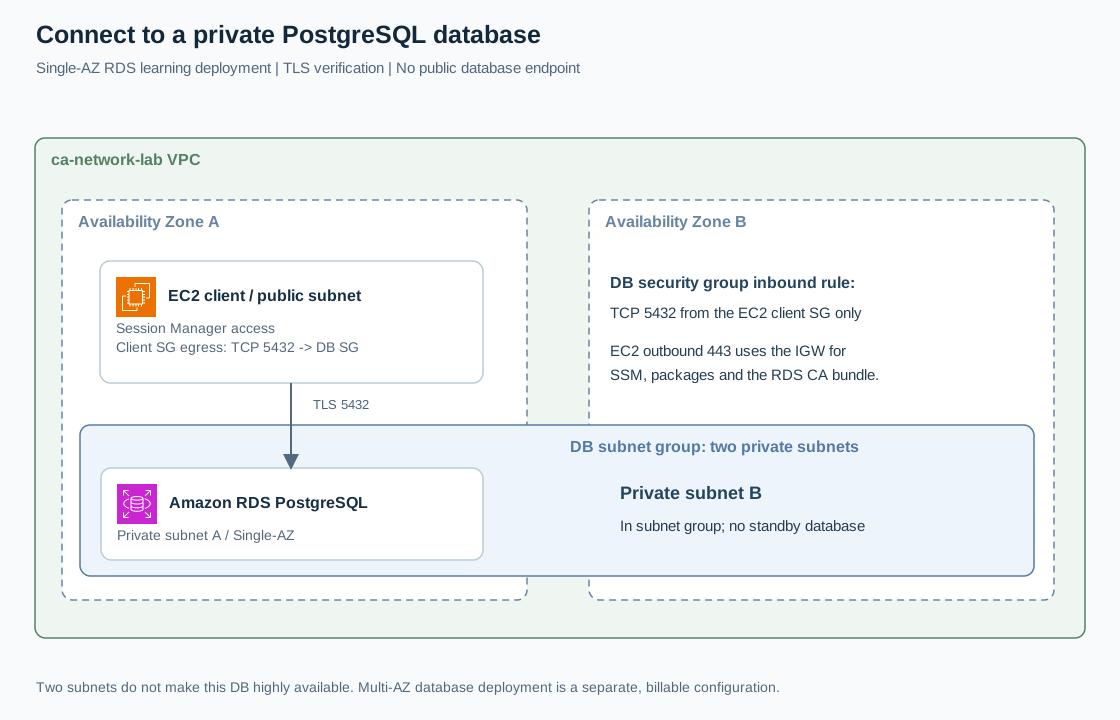
Open the full-size architecture diagram
The DB subnet group contains private subnets in two Availability Zones. The Single-AZ database occupies one zone; two subnet choices do not create a standby. The client connects privately over TCP 5432. See RDS networking.
Systems Manager provides the client shell. Its public subnet's internet gateway and public IPv4 enable outbound management and downloads. The database needs neither an internet gateway route nor NAT.
Prerequisites
- Complete account setup and the two-zone VPC lab. Record VPC/private-subnet IDs; enable VPC DNS resolution and hostnames.
- Complete the EC2 Linux lab in that VPC. Keep its Amazon Linux 2023 client running with working Session Manager, SSM Agent, and an instance role containing
AmazonSSMManagedInstanceCore. Record its security group ID and Availability Zone. - Retain the client's outbound HTTPS rule for management and downloads; add database egress below. No inbound SSH is needed.
- Use the same commercial AWS Region and an authorized non-root operator with RDS creation/deletion, VPC security-group/subnet inspection and management, and Session Manager permissions. First-time RDS setup may also require permission to create its service-linked role.
Steps
1. Define the private placement and firewall
In RDS > Subnet groups > Create DB subnet group, enter cloudadhar-db-private, a description, and the lab VPC. Add its two private subnets in different zones, then create.
In VPC > Security groups > Create security group, create cloudadhar-postgres-sg in that VPC. Add one inbound PostgreSQL / TCP 5432 rule. For Source, select the EC2 client's actual sg-... identifier, not an IP range. Keep no other inbound rules. A security group reference authorizes traffic from associated client interfaces; it does not copy the client's inbound rules. See RDS security groups.
Edit the client's ca-web-one-sg Outbound rules. Retain HTTPS 443; add PostgreSQL / TCP 5432 with destination cloudadhar-postgres-sg's actual security-group ID. Save.
2. Create the database
Open RDS > Databases > Create database > Standard create; expand additional configuration as needed.
| Setting | Lab value |
|---|---|
| Engine | PostgreSQL; a current standard-supported version |
| Template and availability | Dev/Test; Single DB instance / Single-AZ |
| DB instance identifier | cloudadhar-inventory-db |
| Credentials | Master username labadmin; self-managed password |
| Instance class | Burstable db.t4g.micro, if offered for your version/Region |
| Storage | General Purpose SSD gp3, 20 GiB; disable storage autoscaling |
| Compute connection | Do not connect automatically to an EC2 resource |
| Network | IPv4; lab VPC; cloudadhar-db-private |
| Public access | No |
| Security groups | Only cloudadhar-postgres-sg; remove default selection |
| Availability Zone | The client's zone, if offered |
| Initial database name | inventory |
| Encryption | Enabled; default AWS managed RDS key |
| Backups | One-day retention; no cross-Region replication |
| Optional monitoring | No Enhanced Monitoring; no paid advanced Database Insights |
| Deletion protection | Off for this disposable lab |
Generate a unique password in a password manager; enter it only in the console. Production applications need a dedicated database user and managed secret. If the class is unavailable, review the smallest supported alternative's cost. Inspect the estimate, create, and wait for Available. See creation settings.
3. Install the client and verify TLS
Open the EC2 instance, then Connect > Session Manager > Connect. Run in its Linux shell:
sudo dnf install -y postgresql15
psql --version
curl --fail --silent --show-error --location \
  https://truststore.pki.rds.amazonaws.com/global/global-bundle.pem \
  --output "$HOME/rds-global-bundle.pem"
AWS documents postgresql15 for the Amazon Linux 2023 client. The official CA bundle supports commercial Regions.
Copy the endpoint from RDS > cloudadhar-inventory-db > Connectivity & security. Paste its hostname, without protocol or port:
read -r -p "RDS endpoint hostname: " DB_ENDPOINT
psql "host=$DB_ENDPOINT port=5432 dbname=inventory user=labadmin sslmode=verify-full sslrootcert=$HOME/rds-global-bundle.pem connect_timeout=10" -W
Enter the password interactively; it is not echoed. verify-full checks the certificate chain and hostname. Keep the RDS DNS name rather than substituting an IP address. Inside psql, run \conninfo; expect an SSL connection description. See PostgreSQL TLS verification.
4. Write and read known records
Run this repeatable SQL in psql:
CREATE TABLE IF NOT EXISTS lab_inventory (
    sku text PRIMARY KEY,
    quantity integer NOT NULL CHECK (quantity >= 0)
);
INSERT INTO lab_inventory (sku, quantity) VALUES
    ('CABLE', 12), ('KEYBOARD', 5), ('MOUSE', 8)
ON CONFLICT (sku) DO UPDATE SET quantity = EXCLUDED.quantity;
SELECT sku, quantity FROM lab_inventory ORDER BY sku;
SELECT SUM(quantity) AS total_units FROM lab_inventory;
SELECT ssl FROM pg_stat_ssl WHERE pid = pg_backend_pid();
Expect three rows, total_units 25, and ssl t. Exit with \q, reconnect, and repeat the SELECT to demonstrate persistence.
Verification
Save query output, total, SSL result, Publicly accessible: No, and security-group source. Exclude passwords.
For timeouts, check database availability, matching VPC, client egress, TCP 5432 ingress source, and custom network ACLs. Password failures require the correct labadmin password; do not relax the firewall. Certificate failures require a valid bundle and exact endpoint. If inventory is missing, check the initial database name.
Cost and cleanup
RDS instance time, allocated storage, backups, EC2/EBS, public IPv4, and possible cross-zone transfer incur charges. Free-tier eligibility is account-specific. Review PostgreSQL pricing; stopping a database is not permanent cleanup.
For these disposable records, select the DB instance and Actions > Delete. Disable deletion protection first if enabled. Explicitly uncheck Create final snapshot and Retain automated backups, acknowledge data loss, and enter the requested confirmation. If keeping valuable data instead, create a final snapshot and budget for retained storage. See RDS deletion behavior.
Wait until the instance disappears. Remove its unneeded Manual snapshots and Retained automated backups. Remove the client's new TCP 5432 outbound rule. Delete cloudadhar-db-private, then cloudadhar-postgres-sg after RDS releases its interfaces. Preserve shared clients/subnets; for dedicated resources, follow prerequisite cleanup for EC2, volumes, roles, and VPC.