
Overview
A small team wants a temporary status-page server to learn Linux operations before introducing load balancing. Launch one Amazon Linux 2023 instance, install Apache, restrict HTTP to your own public IP, and administer it using Session Manager. Finish by deliberately stopping the web service, identifying the fault, and restoring it.
This is a disposable HTTP exercise. It has one server, no TLS, and no automatic replacement. Use synthetic content; a production status service needs a separate availability and security design.
Architecture
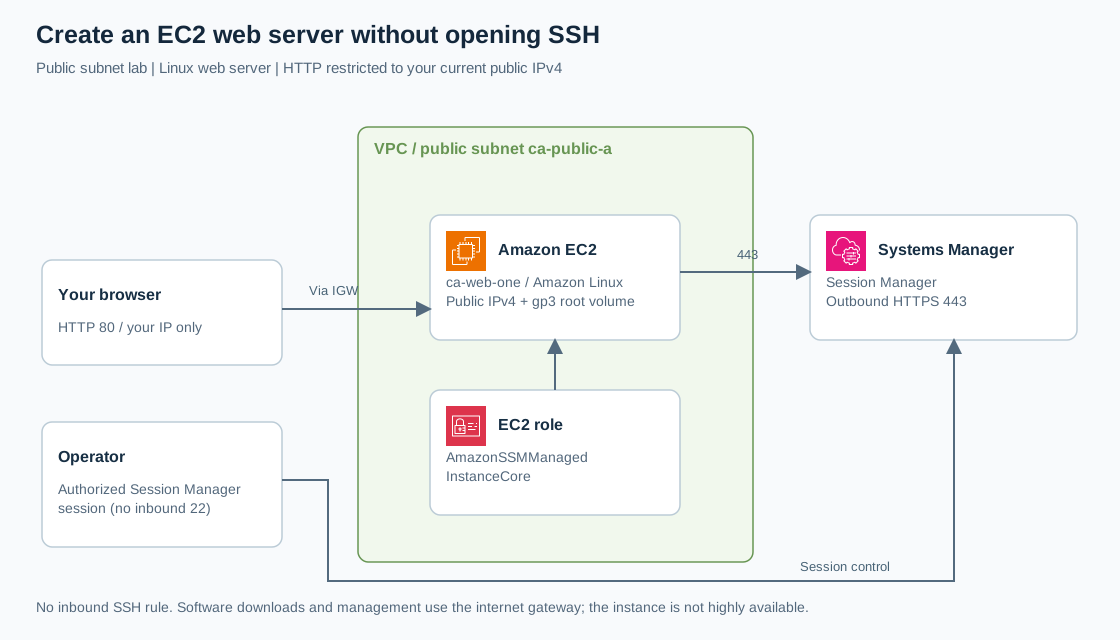
Open the full-size architecture diagram
Reuse ca-network-lab in us-east-2 from the two-AZ VPC lab. Put ca-web-one in ca-public-a, CIDR 10.20.0.0/24. Its public IPv4 and public route enable package downloads and HTTPS connections to Systems Manager without a NAT gateway.
The instance's security group accepts TCP 80 only from your public IPv4 /32. It has no inbound SSH rule. An IAM instance role supplies Systems Manager credentials; no access keys are stored on disk. Session Manager's agent initiates outbound service connections. See AWS Session Manager.
Prerequisites
- The previous VPC lab, including
ca-public-a → ca-public-rt → ca-igw; NAT is unnecessary. - A sandbox identity allowed to launch/terminate EC2, manage lab security groups, create the dedicated IAM role, and pass only that role to EC2.
- Permission to start Session Manager sessions on this lab instance. The instance role and your operator permissions are separate.
- A browser on a stable public IPv4 connection, and a cleanup window of about one hour. Do not assume Free Tier eligibility.
Steps
1. Create the instance role
In IAM → Roles → Create role, select AWS service, use case EC2, and attach only AmazonSSMManagedInstanceCore. Name the role ca-ec2-ssm. The console creates its instance profile. Keep its trust relationship limited to the EC2 service; do not attach AdministratorAccess or an application-data policy.
This limits the role to the managed-instance capability needed here, though the AWS managed policy includes required wildcard permissions. Assign it only to your lab instances. Follow AWS instance-permission setup if your organization provisions roles centrally.
2. Create a narrow security group
In EC2 → Security Groups → Create security group, name it ca-web-one-sg, describe it as Single-server HTTP lab, and select the recorded ca-network-lab VPC ID.
Add one inbound rule: HTTP, TCP 80, source My IP. Record the resulting /32 address. Add no SSH, HTTPS, or IPv6 inbound rule. For outbound traffic, replace the default allow-all rule with HTTPS, TCP 443, destination 0.0.0.0/0. This allows AWS service connections and HTTPS package downloads, not inbound access. Leave the VPC's default network ACL unchanged.
3. Launch the instance
Open Instances → Launch instances. Use these values:
| Setting | Value |
|---|---|
| Name | ca-web-one |
| AMI | AWS-published Amazon Linux 2023, x86_64 |
| Instance type | t3.micro |
| Key pair | Proceed without a key pair |
| VPC / subnet | ca-network-lab / ca-public-a |
| Auto-assign public IP | Enable explicitly |
| Firewall | Existing ca-web-one-sg only |
| Storage | 8 GiB gp3, encrypted, delete on termination |
| Advanced details: IAM instance profile | ca-ec2-ssm |
| Metadata version | V2 only / token required |
Keep detailed monitoring off and launch one instance. Record its instance ID, public IPv4, private IPv4, and root volume ID. Wait for Running and passing status checks. AWS describes the launch wizard.
4. Connect and install Apache
Select ca-web-one, choose Connect → Session Manager → Connect. Allow several minutes for registration. The AWS Amazon Linux 2023 AMI includes SSM Agent; neither a key pair nor port 22 is required. See starting a session.
In that Linux session, run:
sudo dnf install -y httpd
printf 'CloudAdhar status page: ready\n' | sudo tee /var/www/html/index.html
printf 'ok\n' | sudo tee /var/www/html/health.txt
sudo systemctl enable --now httpd
systemctl is-active httpd
systemctl is-enabled httpd
curl -fsS http://127.0.0.1/
curl -fsS http://127.0.0.1/health.txt
Expect active, enabled, the status-page text, and ok. These local checks prove Apache responds without testing internet reachability. Apache's document root and service management are described in the Amazon Linux tutorial; this lab needs no PHP or database.
5. Test the external path and recovery
From the same computer whose address you allowed, open http://PUBLIC_IPV4/, replacing PUBLIC_IPV4 with the instance's current value. Type http:// explicitly: this server has no HTTPS listener. The page must match the local result.
In Session Manager, stop Apache and check it:
sudo systemctl stop httpd
systemctl is-active httpd
curl --max-time 5 http://127.0.0.1/
sudo systemctl start httpd
curl -fsS http://127.0.0.1/health.txt
sudo journalctl -u httpd --since '10 minutes ago' --no-pager
The stopped service should report inactive; curl should fail. Recovery should return ok. A failed curl while Apache is deliberately stopped is expected evidence. Reload the browser after restarting.
6. Troubleshoot in dependency order
| Symptom | Next check |
|---|---|
| Session Manager unavailable | Confirm ca-ec2-ssm profile, public IPv4, active IGW route, DNS settings, and outbound 443; do not open SSH. |
| Session access denied | Check the operator's session permissions separately from the instance profile. |
| Package download fails | Verify outbound HTTPS and DNS; inspect the dnf error instead of adding broad inbound rules. |
| Local curl fails | Run systemctl status httpd and journalctl -u httpd; verify index.html exists. |
| Local works, browser times out | Compare current public IP, My IP source, actual attached SG, and subnet route. A VPN change can invalidate the /32. |
Private instances require an alternate egress or endpoint design for management; AWS endpoint requirements explain that extension.
Verification
Save the instance and role IDs, a screenshot of the one-rule inbound security group, local curl results, and browser output. Record the stopped-service failure and successful restoration. Explain why outbound 443 supports administration without accepting inbound SSH, and why a working local curl does not prove the public route works.
Cost and cleanup
Charges can include EC2 runtime, gp3 storage, public IPv4, data transfer, and burstable CPU surplus credits. Public IPv4 currently costs $0.005/address-hour; verify VPC pricing. Inspect the selected EC2 hourly price before launching; credits or Free Tier depend on your account.
End the session, select only the recorded ca-web-one ID, and Instance state → Terminate instance. Confirm Terminated and verify its root volume disappeared under Volumes. Delete any retained lab volume after checking its ID; stopping an instance retains chargeable storage.
Delete ca-web-one-sg. Retain ca-ec2-ssm and the VPC only if immediately continuing the ALB lab; otherwise delete the unused IAM role/profile and follow the VPC cleanup. No Elastic IP was allocated. Check that no running lab instance or orphaned volume remains.