Overview
Your first cloud project starts with ownership, access and a spending plan. Set up a personal learning account, secure its most powerful identity, and create an alert you can actually receive. This guide creates an account baseline; it does not deploy paid compute resources.
Use a college or instructor sandbox if one is provided. Its owner controls billing and access, so skip personal signup and follow their rules. Keep your evidence in a private notebook: account email, account ID, region, plan, budget name and recovery process. Never include passwords, MFA secrets or payment details in a portfolio.
Architecture
Open the full-size architecture diagram
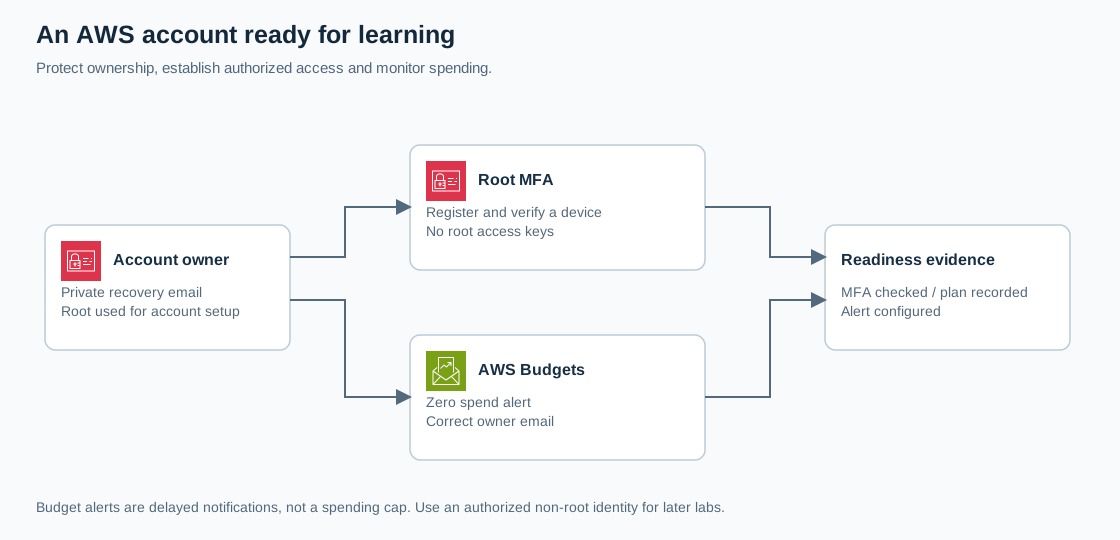
The account is the resource and billing boundary. IAM controls access. MFA protects sign-in. AWS Budgets monitors spending and emails the owner. These controls complement one another: an email alert does not stop running resources, and MFA does not reduce a resource's hourly cost.
Prerequisites
- An email address and phone you control, a valid payment method, and an authenticator app or supported security key.
- Permission from the person responsible for payment. Choose a personal account only when you will own its costs.
- A private password manager and a plan for retaining account recovery access.
Steps
1. Choose the appropriate signup path
Open AWS account signup guidance. AWS is introducing a new project-based signup experience to some customers. This exercise uses the standalone account flow described as Sign up for AWS (advanced); do not assume every screen is identical.
For learners in India, follow the linked AWS India registration instructions, including local billing and identity verification. A college email that will expire after graduation is a poor recovery address for a personal account.
2. Register and activate the account
Open the official signup page through AWS. Enter the owner email and an identifiable account name such as yourname-cloud-learning. Verify the email, set a unique password, and complete the contact, payment and phone checks requested by AWS. Select the included Basic support option if available and you do not need a paid support plan. Wait for the activation email before using services.
Record which account plan you chose. Review the terms shown during signup; payment verification and account eligibility vary by location.
3. Understand your plan before upgrading
New eligible customers may choose a Free or Paid plan. The Free plan currently lasts up to six months or until credits are exhausted, whichever happens first, and only includes selected services. Paid plans can charge beyond credits. Older accounts have different eligibility rules. Check your actual plan and credit expiry in the Billing console rather than assuming a lab is free.
Creating or joining an AWS Organization can automatically move a Free plan account to Paid and affect credits. Do not enable Organizations or Control Tower just to follow an unrelated screenshot. Review the current Free Tier FAQ before that decision.
4. Protect the root identity
Sign in as the account root user for this account-security task. From the account menu, open Security credentials, find Multi-factor authentication, and assign a device. For an authenticator, choose its device type, scan the QR code privately, and enter the requested consecutive codes. Save the registration.
Sign out and sign in again to prove MFA works. Register a backup supported MFA device when available and keep recovery access secure. Do not create root access keys. Never photograph the registration QR code for your lab submission.
5. Create a spending notification
Open Billing and Cost Management, then Budgets, then Create budget. Choose the simplified template workflow and the Zero spend budget template. Name it cloudadhar-learning-alert and enter an email address you monitor. Review the template's threshold and notification settings before creating it.
Reopen the budget to check its account scope, email spelling and alert threshold. If your account or sandbox does not permit this template, have its owner configure an appropriate cost budget; do not add broad billing privileges to a student role. Billing data and notifications are delayed, so an unchanged budget immediately after usage is not proof of zero cost.
6. Prepare day-to-day access
Reserve root for tasks that require it. For subsequent labs, use a separately authorized identity with temporary credentials, preferably your college or trainer's federated role. If you own a standalone account, plan its IAM access with the official IAM guidance before creating workload resources. IAM Identity Center organization setup is a separate decision with the Free plan implications above. For an organization you have chosen to create, follow AWS's administrative access setup. If your trainer supplies access, obtain the sign-in URL, account and assigned role from them. Complete that handoff before resource labs; this account-security exercise does not provision a universal administrator identity, change your account plan or create permanent API keys.
7. Set a working routine
Choose a primary region, such as us-east-2, and record it. For every later lab, estimate its billable components, tag disposable resources, write down their identifiers and schedule cleanup in the same session. Public IPv4 addresses, NAT gateways, load balancers and databases can cost money even in small demonstrations.
Verification
- Account activation is confirmed and the recorded plan matches Billing.
- Root sign-in requires MFA and no root access keys were created.
- The saved budget has the intended scope, threshold and your correct email address.
- You can explain that an alert is not a spending cap.
- Before starting resource labs, an authorized non-root learning identity is available.
Troubleshooting
If activation is pending, check the signup email and official account support. If MFA codes fail, verify the device clock and selected account. If Budgets is denied, ask the account owner to review the required billing permissions. Do not keep creating accounts or broad policies to bypass these issues.
Cost and cleanup
Keep MFA and the billing alert after the exercise. Do not disable security controls as cleanup. No EC2, RDS or NAT resources are required here. Review the current AWS Budgets pricing and your chosen account/support plan. After later labs, inspect billing again because charges can arrive after resources are removed.
For a portfolio, write a redacted readiness checklist and explain three separate controls: authentication, authorization and cost monitoring.