
Overview
A small team keeps its application in GitLab but needs release artifacts inside AWS. Build a two-stage pipeline that receives a GitLab.com commit and stores its source archive as a versioned S3 object. You will trace a release from commit ID to pipeline execution to object version, then prove that a second release preserves the first.
Choose this pattern for a private handoff of static assets, configuration examples, or source bundles. This exercise packages files; it does not compile code, run tests, or publish a website. A production application would add a build-and-test stage and release approval before deployment. These are original lab instructions with expected checks, not a claim that resources have been deployed for you.
Architecture
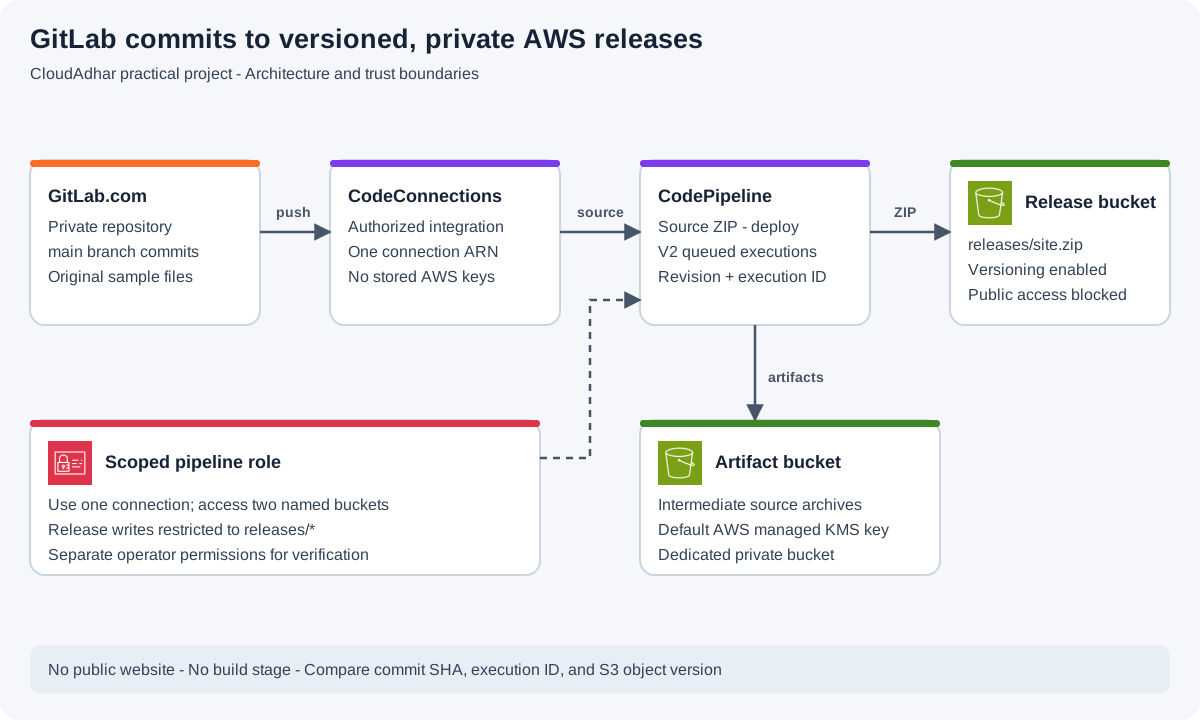
Open full-size architecture diagram
CodeConnections holds the authorized GitLab integration. CodePipeline sequences the source and deployment actions. Its artifact bucket holds intermediate ZIP files; a separate release bucket holds releases/site.zip. S3 versioning preserves earlier uploads to that key. Both buckets block public access. The pipeline role can use one connection and access only these buckets. The console's default AWS managed KMS key protects pipeline artifacts; release objects use the release bucket's SSE-S3 default.
Prerequisites
- Complete the account security and budget lab. Use a sandbox account and one Region, such as
us-east-1. - Use a GitLab.com account with the required Owner access to a disposable project. A paid GitLab subscription or self-managed GitLab server is not required for this design.
- Your AWS operator needs permission to create CodeConnections connections, pipelines, dedicated IAM roles/policies, and S3 buckets;
iam:PassRoleshould cover only the pipeline role. OAuth authorization is an interactive GitLab step. - Have AWS CloudShell available for read-only verification. The verifier needs
s3:ListBucket,s3:GetObject,s3:GetObjectVersion, ands3:ListBucketVersionson the release bucket. Keep account administration permissions out of the pipeline role. - Record your account ID, Region, connection ARN, bucket names, and generated role name in a local worksheet. Do not place passwords, AWS keys, or tokens in GitLab.
Steps
1. Create a tiny release repository
In GitLab.com, choose New project → Create blank project. Name it cloudadhar-release-lab, make it private, initialize a README, and use main as the default branch. In the repository editor, add release.json:
{
  "application": "cloudadhar-release-lab",
  "release": "1.0.0",
  "message": "First private release"
}
Add index.html with the following original sample and commit both files to main:
<!doctype html>
<html lang="en">
<meta charset="utf-8">
<title>CloudAdhar release lab</title>
<h1>Release 1.0.0</h1>
<p>This file is distributed as a private release artifact.</p>
</html>
Record the commit SHA. There is no runner or .gitlab-ci.yml in this project: the AWS pipeline handles delivery.
2. Authorize the connection
Open Developer Tools → Settings → Connections → Create connection in your selected AWS Region. Choose GitLab, enter ca-gitlab-release, and choose Connect to GitLab. Sign in to the intended GitLab account, review the authorization screen, approve the connection, and finish the AWS connection dialog.
Wait for Available, then copy its ARN. An ARN created today normally uses arn:aws:codeconnections:...; older connections may use codestar-connections. Do not substitute the ARN prefix by hand. A connection created through an API remains pending until its interactive authorization is completed. AWS connection setup
3. Prepare separate private buckets
In S3 → Create bucket, create two general purpose buckets in the pipeline Region. Replace the illustrative suffix with your own unique value:
| Setting | Artifact bucket | Release bucket |
|---|---|---|
| Example name | ca-artifacts-ACCOUNT-REGION-SUFFIX | ca-releases-ACCOUNT-REGION-SUFFIX |
| Object ownership | Bucket owner enforced | Bucket owner enforced |
| Block Public Access | All four settings on | All four settings on |
| Versioning | Enabled | Enabled |
| Default encryption | SSE-S3 initially; pipeline wizard selects its artifact KMS key | SSE-S3 |
| Static website hosting | Disabled | Disabled |
Add Project=cloudadhar-gitlab-release tags. Do not add a public bucket policy. In the release bucket, object versions will provide evidence of both releases; they also remain billable until removed.
4. Create the pipeline
Open CodePipeline → Create pipeline → Build custom pipeline. Name it ca-gitlab-s3-release. Select V2 and Queued execution mode so two commits do not deploy concurrently. Choose New service role and record its name.
Under advanced settings, choose the artifact bucket as the Custom location and Default AWS Managed Key for artifact encryption. This is the same-account aws/s3 key; do not select a customer managed key for this exercise. The wizard's artifact encryption selection is separate from the bucket's default encryption setting. Artifact encryption
Configure the source as GitLab.com with ca-gitlab-release, your exact namespace/cloudadhar-release-lab repository, and main. Choose CodePipeline default output format, which produces a ZIP. Keep source-change detection enabled for this branch; no additional path or pull-request filters are needed. Full clone output is intended for a downstream CodeBuild action and is unsuitable for this direct S3 handoff. Source action formats
Skip the build stage. In deployment, choose Amazon S3, the same Region, and the release bucket. Turn Extract file before deploy off and set the object key to releases/site.zip. Leave canned ACL, custom KMS key, and cache-control options unset. Review and create the pipeline. The first execution can start immediately.
5. Check the runtime role before releasing again
Open the pipeline's Settings → Service role in IAM. Its trust relationship must allow codepipeline.amazonaws.com to assume the role. Review all attached policies, including any action-specific policies the wizard added. Scope the effective permissions as follows; use exact ARNs from your worksheet:
| Purpose | Actions | Resource scope |
|---|---|---|
| Fetch GitLab source | codeconnections:UseConnection | The one connection ARN |
| Inspect S3 configuration | s3:GetBucketVersioning, s3:GetBucketAcl, s3:GetBucketLocation | The two bucket ARNs |
| Exchange intermediate artifacts | s3:GetObject, s3:GetObjectVersion, s3:PutObject, s3:PutObjectAcl | Artifact bucket object ARN ending /* |
| Write release | s3:PutObject, s3:PutObjectAcl, s3:PutObjectVersionAcl | Release bucket object ARN ending /releases/* |
Preserve any artifact object-tag permissions generated by the wizard, scoped to the artifact bucket. Add the aws:ResourceAccount condition with your account ID to S3 statements. The action reference includes ACL permissions, but leaving the deployment ACL option unset preserves bucket-owner-enforced behavior. Do not attach AmazonS3FullAccess or administrator access. If an older connection requires the legacy IAM action prefix, use the permissions documented for that connection. Role permissions, connection permissions
Save any scoped changes and choose Release change to verify the effective role. An existing KMS policy or organization policy can still deny access even when the role allows S3; inspect the actual failed action instead of widening the role to all resources.
6. Verify two releases
After the pipeline succeeds, open CloudShell in the same account. Set your actual release bucket and run:
RELEASE_BUCKET='replace-with-your-release-bucket'
aws s3api head-object --bucket "$RELEASE_BUCKET" --key releases/site.zip \
  --query '{Version:VersionId,Bytes:ContentLength,Encryption:ServerSideEncryption}'
aws s3 cp "s3://$RELEASE_BUCKET/releases/site.zip" ./release-one.zip
unzip -p release-one.zip release.json
Expect a nonempty version ID, nonzero byte count, and JSON containing 1.0.0. Change both repository files to 1.0.1, commit to main, and wait for a new automatic execution. Match the execution's source revision to the new GitLab commit SHA. Download to release-two.zip and inspect its JSON, then list versions:
aws s3 cp "s3://$RELEASE_BUCKET/releases/site.zip" ./release-two.zip
unzip -p release-two.zip release.json
aws s3api list-object-versions --bucket "$RELEASE_BUCKET" \
  --prefix releases/site.zip \
  --query 'Versions[].{Version:VersionId,Latest:IsLatest,Modified:LastModified}'
Expect 1.0.1 and at least two versions. Extra manual releases can legitimately create more. Save the two commit SHAs, execution IDs, and corresponding object version IDs. These identifiers form your release evidence; an S3 version ID is not itself a Git commit ID.
Troubleshooting
- Repository missing: confirm the connection's GitLab identity and required project access; complete any pending authorization.
- Source succeeds, deploy fails: compare the destination bucket, Region, object prefix, role resource ARNs, and explicit denies. With ACLs disabled, keep the canned ACL field empty.
- No automatic execution: verify the commit reached
main, source change detection is enabled, and any configured V2 filter includes that branch. - ZIP lacks expected files: select ZIP output rather than full clone and inspect the source revision attached to that execution.
- Access denied when downloading: the human verifier needs read permissions independently of the pipeline role.
Verification
- Source and deploy actions succeed for the two recorded commits.
release-two.zipcontains the intended release metadata, while the earlier S3 version remains downloadable by an authorized operator.- Both buckets retain all Block Public Access settings, and website hosting remains disabled.
- The pipeline role has no unrelated service permissions or wildcard bucket access.
Cost and cleanup
Check current CodePipeline pricing and S3 pricing. V2 action executions, object requests, stored versions, artifact encryption requests, and downloads can contribute charges. This project creates no EC2, NAT gateway, or CodeBuild workload. Do not assume account credits cover it.
Delete the pipeline first so commits cannot create more artifacts. Delete the dedicated connection and revoke its GitLab authorization if no other project uses it. Empty both dedicated S3 buckets using the console's Empty operation, including all object versions and delete markers, then delete the buckets. Remove only this pipeline's IAM role and its now-unused customer-managed policies. The AWS managed aws/s3 key is shared service infrastructure and cannot be deleted like a customer managed key. Remove the disposable GitLab project if you no longer need it. Check S3 and CodePipeline again for remaining lab resources.
References
Official documentation reviewed on 23 September 2026:
- Connect GitLab.com to AWS CodeConnections
- Create a CodePipeline pipeline
- Amazon S3 deploy action settings and permissions
- CodePipeline pipeline types
- GitLab's self-managed AWS proof of concept
The last reference is an optional future project for teams that need to operate GitLab themselves. It introduces server sizing, upgrades, backups, and availability responsibilities; it is not a prerequisite for this GitLab.com pipeline.