
Overview
An internal health endpoint has stopped responding after a network change. The application process is still running and the security group appears correct. Your investigation must distinguish an instance-level permission problem from a missing subnet return path.
Create an isolated VPC with a client and server in different subnets. Serve one synthetic text file on TCP port 8080. Make fresh HTTP requests while changing one rule at a time, recording success, timeout, and recovery. This is a controlled incident investigation, not a recommendation to expose an internal production application.
Use security groups for workload-specific access and a network ACL when you need a subnet-level control, including an explicit deny. Security groups are stateful and contain allow rules; network ACLs evaluate numbered allow/deny rules separately in each direction. Both controls must permit the relevant traffic. Security groups, network ACLs
The instructions and expected results have been reviewed against documentation. No AWS execution is claimed.
Architecture
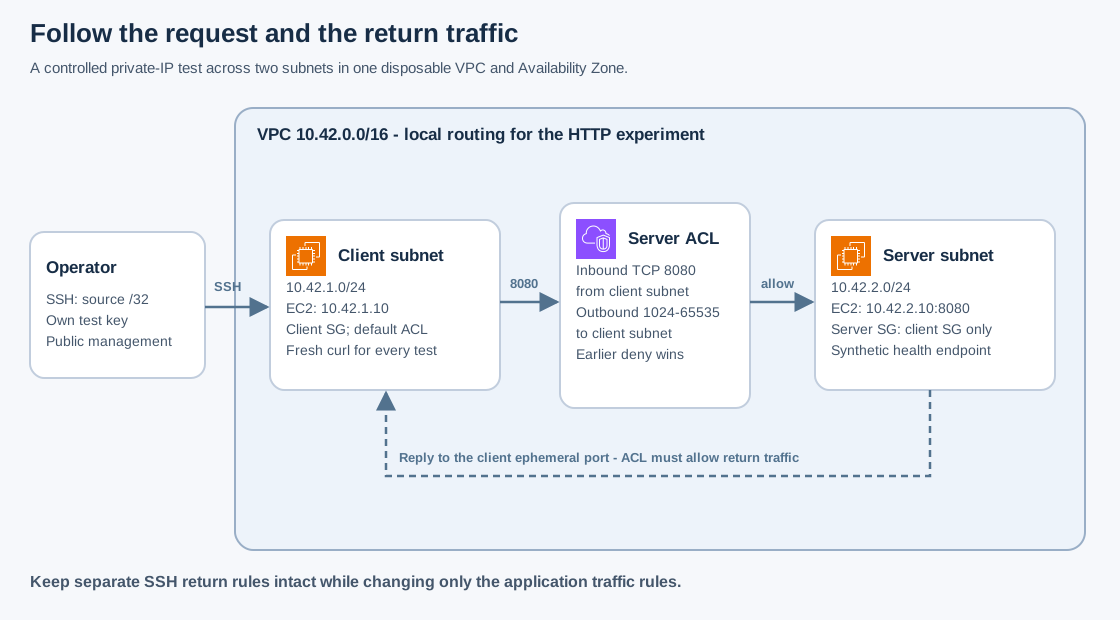
Both subnets use the same Availability Zone and the VPC's local route for the HTTP test. Public IPv4 addresses and an internet gateway provide temporary SSH management from your exact public IPv4 address. The application test uses the server's private address, 10.42.2.10; no internet gateway carries that traffic.
The server security group accepts 8080 only from the client security group. A custom ACL will be attached only to the server subnet. The client subnet keeps its default ACL. There is no load balancer, NAT gateway, database, or dependency on a production VPC.
Prerequisites
- An approved disposable account, AWS CLI v2, Bash, OpenSSH client,
curl, and a stable public IPv4 address. Run these commands on your own workstation with an existing temporary AWS session. - Permission to provision and delete CloudFormation stacks and the EC2/VPC resources in the template; create/delete EC2 key pairs; read the public SSM AMI parameter; and modify the created security group and network ACL rules.
- Region
us-east-1, capacity for twot3.microinstances, and an available VPC quota. These resources can incur charges. - Keep this Bash session and its variables until cleanup. Never modify a shared network ACL, default VPC, or existing security group during these experiments.
Steps
1. Create a disposable management key and stack
Use a unique lowercase suffix, for example your initials and a random number. Confirm the account. MY_IP must be the public IPv4 address AWS will see for your workstation, followed by /32; replace it if your VPN changes egress addresses.
export AWS_REGION=us-east-1
export AWS_DEFAULT_REGION="$AWS_REGION"
aws sts get-caller-identity
SUFFIX="replace-with-your-unique-suffix"
STACK="cloudadhar-network-${SUFFIX}"
KEY_NAME="${STACK}-ssh"
KEY_FILE="${KEY_NAME}.pem"
MY_IP="$(curl --fail --silent https://checkip.amazonaws.com)/32"
printf 'SSH source: %s\n' "$MY_IP"
test ! -e "$KEY_FILE" || { echo 'Choose a fresh key filename'; exit 1; }
umask 077
aws ec2 create-key-pair --key-name "$KEY_NAME" \
  --query KeyMaterial --output text > "$KEY_FILE"
chmod 600 "$KEY_FILE"
Save the following as network.yaml. It uses Amazon Linux 2023's Python runtime to start an HTTP service without installing packages. The root disks are encrypted and deleted on termination. IMDSv2 is required.
AWSTemplateFormatVersion: '2010-09-09'
Description: Disposable CloudAdhar security group and NACL investigation
Parameters:
  KeyName:
    Type: AWS::EC2::KeyPair::KeyName
  MyIp:
    Type: String
  ImageId:
    Type: AWS::SSM::Parameter::Value<AWS::EC2::Image::Id>
    Default: /aws/service/ami-amazon-linux-latest/al2023-ami-kernel-default-x86_64
Resources:
  Vpc:
    Type: AWS::EC2::VPC
    Properties:
      CidrBlock: 10.42.0.0/16
      EnableDnsSupport: true
      EnableDnsHostnames: true
  Gateway:
    Type: AWS::EC2::InternetGateway
  GatewayAttachment:
    Type: AWS::EC2::VPCGatewayAttachment
    Properties:
      VpcId: !Ref Vpc
      InternetGatewayId: !Ref Gateway
  ClientSubnet:
    Type: AWS::EC2::Subnet
    Properties:
      VpcId: !Ref Vpc
      CidrBlock: 10.42.1.0/24
      AvailabilityZone: !Select [0, !GetAZs '']
      MapPublicIpOnLaunch: true
  ServerSubnet:
    Type: AWS::EC2::Subnet
    Properties:
      VpcId: !Ref Vpc
      CidrBlock: 10.42.2.0/24
      AvailabilityZone: !Select [0, !GetAZs '']
      MapPublicIpOnLaunch: true
  RouteTable:
    Type: AWS::EC2::RouteTable
    Properties:
      VpcId: !Ref Vpc
  InternetRoute:
    Type: AWS::EC2::Route
    DependsOn: GatewayAttachment
    Properties:
      RouteTableId: !Ref RouteTable
      DestinationCidrBlock: 0.0.0.0/0
      GatewayId: !Ref Gateway
  ClientAssociation:
    Type: AWS::EC2::SubnetRouteTableAssociation
    Properties:
      SubnetId: !Ref ClientSubnet
      RouteTableId: !Ref RouteTable
  ServerAssociation:
    Type: AWS::EC2::SubnetRouteTableAssociation
    Properties:
      SubnetId: !Ref ServerSubnet
      RouteTableId: !Ref RouteTable
  ClientGroup:
    Type: AWS::EC2::SecurityGroup
    Properties:
      GroupDescription: SSH from one operator; outbound test requests
      VpcId: !Ref Vpc
      SecurityGroupIngress:
        - IpProtocol: tcp
          FromPort: 22
          ToPort: 22
          CidrIp: !Ref MyIp
  ServerGroup:
    Type: AWS::EC2::SecurityGroup
    Properties:
      GroupDescription: SSH from operator and HTTP from client group
      VpcId: !Ref Vpc
      SecurityGroupIngress:
        - IpProtocol: tcp
          FromPort: 22
          ToPort: 22
          CidrIp: !Ref MyIp
        - IpProtocol: tcp
          FromPort: 8080
          ToPort: 8080
          SourceSecurityGroupId: !Ref ClientGroup
  Client:
    Type: AWS::EC2::Instance
    Properties:
      ImageId: !Ref ImageId
      InstanceType: t3.micro
      KeyName: !Ref KeyName
      SubnetId: !Ref ClientSubnet
      PrivateIpAddress: 10.42.1.10
      SecurityGroupIds: [!Ref ClientGroup]
      MetadataOptions:
        HttpTokens: required
      CreditSpecification:
        CPUCredits: standard
      BlockDeviceMappings:
        - DeviceName: /dev/xvda
          Ebs:
            VolumeSize: 8
            VolumeType: gp3
            Encrypted: true
            DeleteOnTermination: true
  Server:
    Type: AWS::EC2::Instance
    Properties:
      ImageId: !Ref ImageId
      InstanceType: t3.micro
      KeyName: !Ref KeyName
      SubnetId: !Ref ServerSubnet
      PrivateIpAddress: 10.42.2.10
      SecurityGroupIds: [!Ref ServerGroup]
      MetadataOptions:
        HttpTokens: required
      CreditSpecification:
        CPUCredits: standard
      BlockDeviceMappings:
        - DeviceName: /dev/xvda
          Ebs:
            VolumeSize: 8
            VolumeType: gp3
            Encrypted: true
            DeleteOnTermination: true
      UserData:
        Fn::Base64: |
          #!/bin/bash
          set -eu
          mkdir -p /opt/cloudadhar-health
          printf 'cloudadhar-network-ok\n' > /opt/cloudadhar-health/health.txt
          cat > /etc/systemd/system/cloudadhar-health.service <<'UNIT'
          [Unit]
          Description=Disposable health fixture
          After=network.target
          [Service]
          User=nobody
          ExecStart=/usr/bin/python3 -m http.server 8080 --bind 0.0.0.0 --directory /opt/cloudadhar-health
          Restart=on-failure
          [Install]
          WantedBy=multi-user.target
          UNIT
          systemctl daemon-reload
          systemctl enable --now cloudadhar-health
Outputs:
  VpcId:
    Value: !Ref Vpc
  ServerSubnetId:
    Value: !Ref ServerSubnet
  ClientGroupId:
    Value: !Ref ClientGroup
  ServerGroupId:
    Value: !Ref ServerGroup
  ClientPublicIp:
    Value: !GetAtt Client.PublicIp
  ServerPublicIp:
    Value: !GetAtt Server.PublicIp
Deploy and read outputs after the stack finishes. CloudFormation completion does not guarantee that user data has finished; allow the server a minute to start.
aws cloudformation deploy --stack-name "$STACK" --template-file network.yaml \
  --parameter-overrides "KeyName=$KEY_NAME" "MyIp=$MY_IP"
stack_output() {
  aws cloudformation describe-stacks --stack-name "$STACK" \
    --query "Stacks[0].Outputs[?OutputKey=='$1'].OutputValue | [0]" --output text
}
VPC_ID=$(stack_output VpcId)
SERVER_SUBNET=$(stack_output ServerSubnetId)
CLIENT_SG=$(stack_output ClientGroupId)
SERVER_SG=$(stack_output ServerGroupId)
CLIENT_PUBLIC=$(stack_output ClientPublicIp)
SERVER_PUBLIC=$(stack_output ServerPublicIp)
probe() {
  ssh -i "$KEY_FILE" "ec2-user@$CLIENT_PUBLIC" \
    'curl --fail --connect-timeout 3 --max-time 5 -H "Connection: close" http://10.42.2.10:8080/health.txt'
}
probe
On first connection, verify and accept the new instance's host key using your approved SSH process; do not disable host-key checking. Expected output is cloudadhar-network-ok. A refusal usually means no listener; a timeout suggests filtering or routing. Use SSH to the server and sudo systemctl status cloudadhar-health plus curl http://localhost:8080/health.txt to establish application health before changing network rules.
2. Prove the security group boundary
Remove the one application ingress permission, issue a fresh probe, then restore it. Each probe starts a new curl process so a previous tracked connection cannot mask the change.
aws ec2 revoke-security-group-ingress --group-id "$SERVER_SG" \
  --protocol tcp --port 8080 --source-group "$CLIENT_SG"
probe
aws ec2 authorize-security-group-ingress --group-id "$SERVER_SG" \
  --protocol tcp --port 8080 --source-group "$CLIENT_SG"
probe
Expect timeout, then success. Next remove the server's default outbound allow rule:
aws ec2 revoke-security-group-egress --group-id "$SERVER_SG" \
  --ip-permissions '[{"IpProtocol":"-1","IpRanges":[{"CidrIp":"0.0.0.0/0"}]}]'
probe
The incoming HTTP connection should still receive its response. Security-group connection tracking permits response traffic; this does not mean the server can initiate arbitrary outbound connections. Rule changes can behave differently for existing tracked connections, which is why this experiment uses fresh requests. EC2 connection tracking
3. Add an explicit subnet return path
Create a new ACL, record the original association, and add rules before associating it. Custom ACLs initially deny traffic. Management SSH has its own inbound and return rules, separate from the experiment.
DEFAULT_ACL=$(aws ec2 describe-network-acls \
  --filters "Name=association.subnet-id,Values=$SERVER_SUBNET" \
  --query 'NetworkAcls[0].NetworkAclId' --output text)
OLD_ASSOC=$(aws ec2 describe-network-acls \
  --filters "Name=association.subnet-id,Values=$SERVER_SUBNET" \
  --query "NetworkAcls[0].Associations[?SubnetId=='$SERVER_SUBNET'].NetworkAclAssociationId | [0]" --output text)
ACL_ID=$(aws ec2 create-network-acl --vpc-id "$VPC_ID" \
  --query NetworkAcl.NetworkAclId --output text)
aws ec2 create-tags --resources "$ACL_ID" --tags "Key=Name,Value=$STACK-server-acl"
aws ec2 create-network-acl-entry --network-acl-id "$ACL_ID" --rule-number 100 \
  --protocol 6 --rule-action allow --cidr-block "$MY_IP" --port-range From=22,To=22
aws ec2 create-network-acl-entry --network-acl-id "$ACL_ID" --rule-number 110 \
  --protocol 6 --rule-action allow --cidr-block 10.42.1.0/24 --port-range From=8080,To=8080
aws ec2 create-network-acl-entry --network-acl-id "$ACL_ID" --egress --rule-number 100 \
  --protocol 6 --rule-action allow --cidr-block 10.42.1.0/24 --port-range From=1024,To=65535
aws ec2 create-network-acl-entry --network-acl-id "$ACL_ID" --egress --rule-number 110 \
  --protocol 6 --rule-action allow --cidr-block "$MY_IP" --port-range From=1024,To=65535
aws ec2 replace-network-acl-association --association-id "$OLD_ASSOC" --network-acl-id "$ACL_ID"
probe
Expect success. The server's reply goes to the client's ephemeral destination port, not destination port 8080. The broad ephemeral range here accommodates common client operating systems within the two narrow destination CIDRs. In a real environment, confirm the relevant client port ranges. Custom ACL rules and ephemeral ports
4. Reproduce two different NACL failures
Remove only the outbound application-return rule. Keep the SSH-return rule intact. Expect a timeout even though the server security group still accepts 8080. Restore it and confirm recovery.
aws ec2 delete-network-acl-entry --network-acl-id "$ACL_ID" --egress --rule-number 100
probe
aws ec2 create-network-acl-entry --network-acl-id "$ACL_ID" --egress --rule-number 100 \
  --protocol 6 --rule-action allow --cidr-block 10.42.1.0/24 --port-range From=1024,To=65535
probe
Now add an earlier inbound deny. Rule 50 matches before rule 110, so the allow rule cannot rescue the request. Delete rule 50 and verify recovery.
aws ec2 create-network-acl-entry --network-acl-id "$ACL_ID" --rule-number 50 \
  --protocol 6 --rule-action deny --cidr-block 10.42.1.0/24 --port-range From=8080,To=8080
probe
aws ec2 delete-network-acl-entry --network-acl-id "$ACL_ID" --rule-number 50
probe
If results disagree, inspect the ACL actually associated with SERVER_SUBNET, the rule numbers and direction, the client's private source address, and the instance's attached security groups. An unassociated ACL changes nothing. A timeout alone does not identify which control denied a packet; the controlled change and successful rollback provide that evidence.
Verification
Save a small investigation report with UTC time, changed rule, probe exit status, observed output, and recovery result. Do not publish your private key or workstation address.
| Configuration | Expected new HTTP request |
|---|---|
| Initial groups and default ACL | Returns cloudadhar-network-ok |
| Server 8080 ingress removed | Times out |
| Server ingress restored; outbound SG rule removed | Succeeds |
| Custom ACL with both traffic directions | Succeeds |
| ACL application return rule removed | Times out |
| ACL return restored | Succeeds |
| Earlier matching ACL deny added | Times out |
| Earlier deny removed | Succeeds |
The final explanation should identify both ports in the request/response pair and the different evaluation scopes: instance interfaces for security groups, subnet boundary for ACLs. No performance benchmark or packet-loss percentage is inferred from these small tests.
Cost and cleanup
Budget for two Linux EC2 instances, two small gp3 volumes, and two public IPv4 addresses for the full run. Standard burstable CPU credits avoid unlimited-credit charges in this template. There is no NAT gateway or paid reachability analysis. Free-tier eligibility varies; review EC2 pricing, EBS pricing, and VPC public IPv4 pricing. Stopping instances alone leaves disks billable.
The custom ACL was created outside CloudFormation. Restore the original ACL association and delete only that custom ACL before deleting the stack. Recover its ID by the exact recorded value or the Name tag if your shell was lost.
CURRENT_ASSOC=$(aws ec2 describe-network-acls \
  --filters "Name=association.subnet-id,Values=$SERVER_SUBNET" \
  --query "NetworkAcls[0].Associations[?SubnetId=='$SERVER_SUBNET'].NetworkAclAssociationId | [0]" --output text)
aws ec2 replace-network-acl-association \
  --association-id "$CURRENT_ASSOC" --network-acl-id "$DEFAULT_ACL"
aws ec2 delete-network-acl --network-acl-id "$ACL_ID"
aws cloudformation delete-stack --stack-name "$STACK"
aws cloudformation wait stack-delete-complete --stack-name "$STACK"
aws ec2 delete-key-pair --key-name "$KEY_NAME"
If setup failed before ACL association, skip the association replacement and delete the unassociated custom ACL. If the stack reports DELETE_FAILED, inspect its events and remove only the named remaining dependency; never delete a shared default ACL. Confirm the two instances are terminated, their root volumes are deleted, the VPC is absent, and the key pair no longer exists. Delete your local PEM file using your workstation's file manager after verifying its exact filename. The default VPC and all unrelated resources should remain untouched.
References
- AWS: VPC security groups
- AWS: network ACL behavior
- AWS: custom ACLs and ephemeral ports
- AWS: EC2 security group connection tracking
- AWS: retrieve an Amazon Linux AMI through Systems Manager
- User-supplied topic inspiration: security groups versus NACLs — inaccessible during authoring; this original investigation uses the official AWS references above.